mk_ssl_cert.pl
The mk_ssl_cert.pl script, stored in /opt/yce/system/, is used for creating certificate (and related) files.
This script needs to be run before enabling SSL using yce_setup.pl, if files are missing yce_setup will give feedback on it.
The script can be used to create certificate signing request (CSR) that must be submitted to a certificate authority for signing. The returned certificate must then be installed.
But the script can also create a self-signed certificate (CRT) which can be used directly but will evoke warnings on the browser and probably needs TWO (!) exceptions to be added. More on this below.
The tool works interactively using a menu with options. It must be executed as 'yce' user. The tool will use and create files in the /opt/yce/etc directory. This is also the location where the httpd web-server will expect the certificates.
The tool is interactive. Abort at any stage using '<control>-C' or typing quit.
yce@genesis /opt/yce/system
$ mk_ssl_cert.pl
-----------------------------------------------------
Actions:
  1)  generate CONF file (certificate settings)
  2)  generate CSR file (certificate signing request)
  3)  extend   CSR into PEM and INFO files
  4)  generate CRT file (self-signed certificate)
  5)  extend   CRT into PEM and INFO files
  q)  quit
Select action: [1]
First, under option 1), a number of configuration parameters need to be answered. The results will be stored in a CONF file that will provide the default answers for a follow-up session (/opt/yce/etc/ssl_cert.conf). Certificates are usually issued for a 1-year period.
Select action: [1] 1
  Please enter appropriate values for the certificate.
    (blank values will be ignored)
    Country Name (2 letter code) [NL]
    Domain name (genesis.netyce.org or *.netyce.org) [genesis.netyce.org]
    Locality Name (eg city) [Weesp]
    Organization Name  [NetYCE]
    Organizational Unit (eg section) [Development]
    State or Province Name  [Noord-Holland]
    Email address  [[email protected]]
  -> created CONF file: /opt/yce/etc/ssl_cert.conf
Next choose option 2) to get the file needed to request a true SSL certificate or option 4) to create a 'self-signed' certificate that could be a temporary but quick means to get some security.
Option 2) will first generate a KEY file for the host and a CSR file. This CSR file must be submitted for signing by an external CA organisation. All certificate files must use the filename convention “<hostname>.<domain>.<ext>”“, eg genesis.netyce.org.csr.
The certificate file returned by the CA must be copied back to the /opt/yce/etc directory and renamed to same name convention, but use the CRT extension, e.g. “genesis.netyce.org.crt”. Only when the CRT file is in place should yce_setup.pl be executed and the SSL prompt be answered affirmative.
For option 4), the self-signed certificate, the CRT is created immediately and will be used once the yce_setup.pl is completed.
Options 3) and 5) are useful to create extensions of the CSR or CRT in the form of INFO and PEM files. The INFO files report some details that can be extracted from the CSR or CRT.
Please be aware that a KEY file is always used in conjunction with a certificate. Regenerating a KEY file will render a CRT or CSR useless. So instead of overwriting an existing KEY file, the tool will prompt you if a KEY is already present.
Select action: [1] 2
  Creating CSR
  -> have    KEY file: /opt/yce/etc/genesis.netyce.org.key
  WARNING: a KEY file already exists - overwriting will obsolete existing certificates!
  Use existing KEY file or create new?  [Y] ?
    enter 'y' to overwrite, 'n' to create new
  Use existing KEY file or create new?  [Y]
Once the KEY and CRT and files are in place, yce_setup.pl can be run.
Self signed certificates
when using self-signed certificates, the browser will not be able to verify the authenticity of your SSL certificate with the CA and issue a warning or even disallow access to the site. This is normal behaviour and these warnings have over time become more severe and strict. Every browser will react differently making it more or less difficult to force it to accept your self-signed certificate.
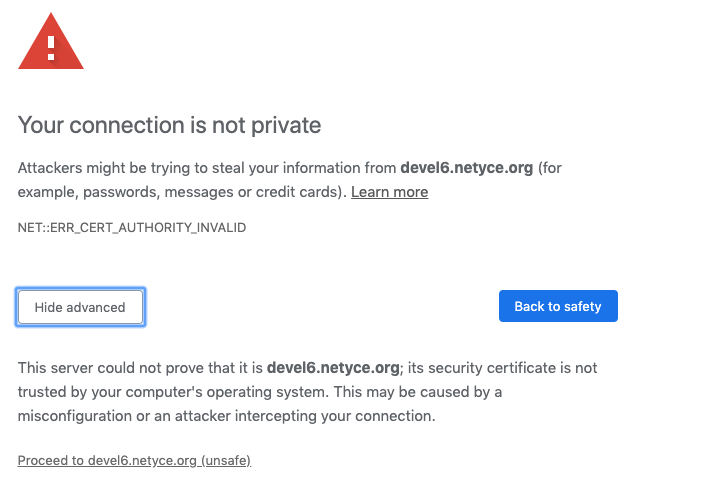 |
The browser usually gives you an option to accept the risk after clicking an 'advanced' option, and may demand you to create a “security exception” to allow you access.
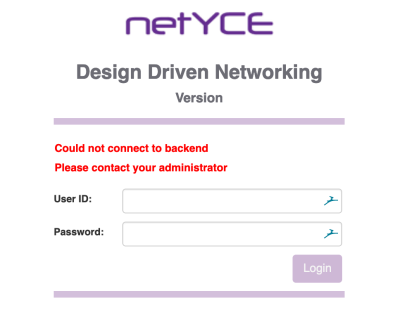
However, this may not result in a workable NetYCE front-end just yet. NetYCE uses TWO connections to its servers, one for the http content (now using port 443 for SSL) and one for the data (using port 8080).
When the login page shows the error message “Could not connect to backend - Please contact your administrator”, it is complaining the browser has no access to the data connection on port 8080. With a self-signed certificate, it is likely the browser itself is preventing this access due to the insecure SSL certificate.
The resolution requires the user to access the port 8080 directly and then repeat the exception process. Change the URL in the browser from
https://genesis.netyce.org/#/login
to
https://genesis.netyce.org:8080
After accepting the risks or creating another exception, a page with “raptor not found” is displayed. This confirms the connection to the data port but denies access because you are not logged in yet.

Then the user can go back to the regular login-page where he can login normally.
Depending on the browser and the actions taken, the user must repeat this process each time he restarted his browser.