Table of Contents
Download WIKI installation files
This entire NetYCE Wiki can be installed locally at your NetYCE server. This will offer the full search capabilities of this site, but without the Internet access or the login requirements.
The local NetYCE WIKI installation consists of two parts. First there is the DokuWiki engine setup for NetYCE wiki and secondly the actual Wiki content. Both can be downloaded from this page and are daily updated. Normally, only the Wiki content part needs to be regularly downloaded and installed on your local YCE-server(s).
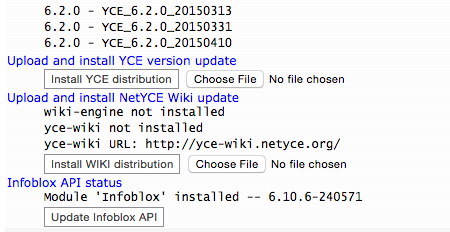
These NetYCE wiki installation distribution files can be installed using the NetYCE web-based front-end using the Admin - System - System status page. After requesting the full report, locate the “Install Wiki distribution” button and click the Choose file button next to it. Select the downloaded file and confirm (or drag it onto the Choose file button). Then click the Install Wiki distribution button.
Both parts need to be installed this way.
IMPORTANT
Before the wiki-engine and yce-wiki packages are installed, the system requires some one-time modifications.
Follow the “Regular setup” steps below. Should they fail, then please have the system administrator review or execute the steps in the “manual setup”.
Regular setup
The regular setup involves a semi-automatic process for its first-time installation. The following steps will make the NetYCE system modifications to create a virtual host on your NetYCE server to use a dedicated unique URL for the NetYCE Wiki.
(1)
Add an alias (or Cname) to the DNS for this NetYCE server to access the Wiki.
E.g. yce-wiki.my.domain.
(2)
The application manager of the NetYCE system must login on the server and run - as yce user - the
setup script: yce_setup.pl
Enter the chosen Wiki alias name and domain at the appropriate questions of this setup script. Below a section of the dialog involved with this setup:
:::
Login setup:
    Domain name for login (single-sign-on cookie)? [netyce.org]
    Hours until Login session expiry (single-sign-on cookie)? [12]
Login setup:
  Single-sign-on domain          Expire (hrs)
  netyce.org                     12
  Is this Login setup correct?  [Y]
Wiki setup:
    'yceseven' will use the NetYCE public Wiki server? [Y] n
    The (alias) name of the local Wiki server? [wiki] wiki
    the domain name of the local Wiki server? [netyce.org] netyce.org
Wiki setup:
  Local    Protocol Hostname             Domain                                   Ip-address
  yes      http     wiki                 netyce.org
  Is this Wiki setup correct?  [Y] y
:::
When finishing the process, an updated Apache http configuration file will be generated and installed. The subsequent restarting of the http server will activate this change.
(3)
While at it, the administrator needs to verify that the PHP module for the Apache http server, mod_php is installed.
$ rpm -qa | grep -i php
php-common-5.3.3-49.el6.x86_64
php-cli-5.3.3-49.el6.x86_64
php-5.3.3-49.el6.x86_64
The actual version numbers will likely to have changed to more recent values.
If mod_php is not installed, then do so using yum or rpm.
The commands may vary depending on the administration procedures used by your organization.
$ sudo yum install mod_php
Loaded plugins: fastestmirror, security
Setting up Install Process
Loading mirror speeds from cached hostfile
 * base: mirror.i3d.net
 * extras: nl.mirror.babylon.network
 * updates: mirror.prolocation.net
base                                                                                   | 3.7 kB     00:00
extras                                                                                 | 3.4 kB     00:00
mariadb                                                                                | 2.9 kB     00:00
updates                                                                                | 3.4 kB     00:00
updates/primary_db                                                                     | 4.7 MB     00:01
Package php-5.3.3-49.el6.x86_64 already installed and latest version
Nothing to do
(4)
Now download and install the “wiki-engine.bin” and “yce-wiki.bin” files.
First the wiki-engine, then the yce-wiki. At the completion of the latter, the URL of step () will be linked to the yce-wiki content and any customer special Wiki pages included in your license file will be installed.
Before installation:
Executing:
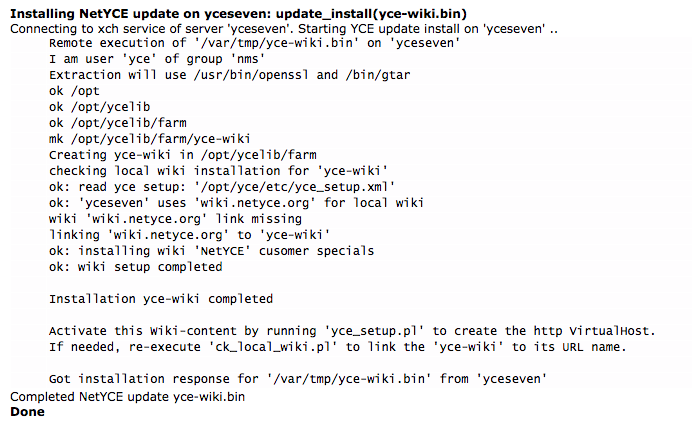
Completed installation:

Manual setup
The “Manual setup” is a guide that can be used instead of the procedure above, but also serves to verify the procedure made all appropriate modifications. Especially if the httpd configuration file is not alterable by the yce functional user.
(1)
The NetYCE wiki installation distribution files can also be installed on the command line (as 'yce' user).
First upload the downloaded 'wiki-engine.bin' image to your NetYCE server, then install it as user 'yce' using the command: sh wiki-engine.bin.
This will create a file tree under /opt/ycelib/wiki. If a previous installation was found, it is renamed to wiki.0.
Likewise, install the Wiki content image using sh yce-wiki.bin
This will create a file tree under /opt/ycelib/farm/yce-wiki. If a previous installation was found, it is renamed to yce-wiki.0.
If your /opt/yce/etc/yce_setup.xml file has the required attributes for <wiki /> under the <yce name=“(hostname)”> object, then a url-like symlink to the yce-wiki directory might already exist.
(2)
Add an alias (or Cname) to the DNS for this NetYCE server to access the Wiki.
E.g. yce-wiki.my.domain.
(3)
Run - as yce user - /opt/yce/system/yce_setup.pl
Enter the chosen Wiki alias name and domain at the appropriate questions of this setup script.
This will modify the <wiki> attributes in the file /opt/yce/etc/yce_setup.xml
<wiki domain="my.domain" ip="" local="yes" name="yce-wiki" proto="http" />
(4)
Ensure the Apache mod_php is installed. See the “Regular setup” for details.
(5)
Modify the /etc/httpd/conf/httpd.conf configuration file in the following manner:
1) Define the various VirtualHosts as being based on the server name (instead of ip-address):
NameVirtualHost *:80
2) Insert a new VirtualHost for the new Wiki alias:
 <VirtualHost *:80>

  ServerName yce-wiki.my.domain
  ServerAlias yce-wiki
  DocumentRoot "/opt/ycelib/wiki"

</VirtualHost>
This section must appear BEFORE the VirtualHost of non-aliased the NetYCE application.
When completed, restart the http server (sudo /etc/init.d/httpd restart).
(6)
The wiki alias specified in the VirtualHost section above must link to the wiki content directory. The content directory is located in /opt/ycelib/farm/yce-wiki. Create a symbolic link from this directory to the specified wiki alias name:
As 'yce' user:
 cd /opt/ycelib/farm
 ln -s yce-wiki yce-wiki.my.domain
Ensure the PHP server can access the session directory to store temporary session information
As 'root' user:
 cd /var/lib
 chown -R yce.nms php
Alternatively:
 cd /opt/ycelib/wiki
 echo "php_value session.save_path '/var/opt/yce/jobs/session'"> .htaccess
 mkdir /var/opt/yce/jobs/session
(7)
When making manual changes to the http configuration file, you need to make an additional step to ensure your changes are not overwritten by future automatic updates.
As yce user, edit the file /opt/yce/etc/yce_setup.xml and modify the <configs> attribute for httpd in keep:
<configs crontab="update" httpd="keep" mysql="update" network="update" />